Tuesday, April 30, 2013

Adventures in {DIY Almond Milk}

I'm sitting here sipping my coffee with almond milk, as I do every morning.  The only difference is that the almond milk in my coffee is HOMEMADE, and SOoooo Delicious (pun intended).   :)


How I went 2.5 years buying store-bought almond milk in a carton, I have no idea.  So many other bloggers and even a good friend, Katie of Zenutrition make their own milk at home.  Finally, last week as I was ordering a few books from Amazon, I remembered to purchase a nut milk bag, which is a fine mesh bag used to separate the milk from the almond pulp.

Almond Milk (4 cups)
4 c filtered water (mine is distilled/mineralized)
1 c organic almonds
1/2 tsp cinnamon (optional)
2 tsp honey (optional)
1 tsp vanilla (optional)

Directions:

Step 1:   Cover almonds by 2 inches in filtered water overnight (8-12 hours). They will have plumped up by morning.   Drain and rinse. 


Step 2:  Put 4 c filtered water and 1 cup almonds into a blender and blend for 2 minutes, until almond chunks are fine and milk is frothy.  Mine even frothed up through the top of my blender!

During the blending....
 Step 3:  I found that the easiest way to strain and get the milk into an old milk bottle was this method:
Straining through the nut milk bag and funneling into the glass container.

Wring the nut milk out of the bag by twisting it and squeezing until pulp in the bag is fairly dry. 

Step 4 (Optional):   Take the strained milk and whizzz again if you're adding any flavorings like the cinnamon, honey and vanilla.  You can stir it in, but this is the most efficient way of mixing honey in.  You could also use liquid stevia and whatever else you'd like to flavor the milk.   I'm sure I'll eventually get creative and try savory milk flavors.

Finished product: delicious, pure, almond milk!

That's it!  Due to not having the added gums like carrageenan and guar gum, this milk will separate and require a shake prior to each use.  The container is from a local dairy producer, Caulders, and works perfectly.  Glass is an ideal storage method, as it won't leach any toxins or plastics into your precious finished product.

BONUS: the leftover pulp, which is being dried out in the oven at 170 degrees for a couple hours...can be used for baking!
So, this method of DIY is actually not more cost effective than buying it at the store.  If your almonds are $6.49 per pound like mine were, that works out to 3 cups of almonds (3 batches), each batch costing $2.19.  At the store, I normally pay $1.79 or so for 4 cups of almond milk.

However, the results are a rich, delicious, fresh milk that you know does not contain any additives or preservatives.  It's super easy to make and doesn't require the waste of purchasing a tetrapack container that will end up in a landfill somewhere.   Green it up and make your own!  Enjoy. 

Tuesday, April 23, 2013

Nutrition Test RESULTS Dun Dunn Dunnnnn (Part 2)

As promised, I am following up my post from a couple weeks back with the results of the nutrition test.  (I'm sure you've all been on pins & needles waiting).  Ha.   To review,  the point of me taking the test is not to see IF I'm healthy, but to determine where I stand in terms of Optimimal Nutrition, rather than just "passing grade" levels of nutrition.  

15+ pages of results of over 150 tests and markers, and a couple of hours of analysis....and I was provided with a simple "report card" by my naturopath to make it easy for me to understand.   FYI the report you see below does NOT reflect the entirety of the test; but breaks things down for the lay-person.   The test would have been almost impossible to interpret on my own, due to all of the complicated "markers" tests used, look at functionality of processes in the body, but not necessarily the nutrient itself.


So, I got a B which is "Above Average" in the grand scheme of things.   I guess I'll take it, although the perfectionist in me wants to definitely improve the Cs or low B's.   

STRENGTHS:

CHOLESTEROL - My levels were great!   AND I eat about a dozen eggs per week.  Take that, medical community. 
Cholesterol 190
Triglycerides 36
HDL 73
LDL 109

TRANS FATS -  I am VERY PROUD of that A!!!!

IRON - All of that sesame seed & tahini eating is paying off! 

FATTY ACIDS - Omega's were pretty good, will plan to get those a little higher. 

CARBOHYDRATES - Yay, all the fiber I eat! ;)  Will cut back a bit more on the sugars, although my sugar intake is mainly fruits and honey. 


WEAKNESSES: 

PROTEIN.  Now, I have cut way back on meat in the last couple of years, but still make sure to eat protein with each meal.   Plenty of legumes, beans, nuts, seeds.   Here's the thing.  I barely eat red meat...ever.   I just don't really prefer it.   But, in order to get my levels of tyrosine and BCAA's (amino acids),  I will be incorporating a bit more grass fed red meat and and will get an amino acid supplement.  

MICROMINERALS. Zinc and copper were just passing.   Zinc is REALLY hard to get enough of in foods.  It's probably a very safe bet to say most people are deficient. It's found in organ meats, other red meats, oysters and pepitas.   I even make a pointed effort to go out for oysters (every couple weeks) and eat pepitas (pumpkin seeds). With my new plan, am now taking a Zinc+Copper by New Chapter.  Perhaps some grass-fed calf liver & onions.  (NOW I get why this was an important part of ancestral diets)
HEAVY METALS.  This didn't go on my report card, but my levels of arsenic were pretty high!   Now, this includes inorganic as well as organic sources and doesn't differentiate. Organic arsenic is found in seafood, which I eat quite a bit of.  I think the problem, however, is brown rice.  I eat quite a bit of brown rice and will definitely need to watch where I am getting it too. U.S. grown seems to be the biggest culprit of arsenic-laden rice.  Soaking the rice and also cooking in more water than necessary and draining will help remove any traces.  Cadmium and lead were a bit elevated too, although not in the "danger" zone at all.  I plan on doing a cleanse to help flush out any remaining bits. 


PLAN OF ACTION:

1)  Eat more protein (including leaner cuts of red meat), take paleofiber in the a.m. and get a branch chain amino acid supplement because I just WON'T be adding enough red meat to dramatically increase my efforts
2)  Focus on getting more cooking herbs (for vitamin K and detoxification)
3)  Continuing my new zinc/copper regimen and eating even more oysters. ;)
4)  More mushrooms + 10,000 IU Vitamin D per day 
5)  More potatoes (increase potassium) and less rice (lessen arsenic)
6)  Do a heavy metal cleanse and eat more herbs like cilantro
7)  Work on a LITTLE less sea salt. :)
8)  MORE CHOCOLATE for magnesium, woohoo!
9)  Take Methyl factors supplement for my unmetabolised folic acid

I would definitely recommend looking into this test for anyone who's either a nutrition-perfectionist like myself and want to see exactly how your efforts translate into your nutrition status -OR- for people who just all around aren't feeling great and want to start with a baseline check of nutrition. 

Our health is our wealth!

~Angela

Wednesday, April 17, 2013

Mediterranean Quinoa Salad

::Quick post since it's almost my bedtime::    After a long day today at the office, I whipped up this quick and healthy side dish.  We had it with homemade chicken soup.  Too good not to share...enjoy!


Mediterranean Quinoa Salad

Ingredients:

1 cup white or red quinoa, rinsed well*
1/4 c sun dried tomatoes
2 oz (approx 1/4 c) crumbled feta
2 large cloves garlic, minced
1 T olive oil
1 small lemon, zested and juiced
1-2 tsp fresh herbs (think: basil...oregano...parsley...rosemary...thyme)
Optional:  serve over bed of baby spinach (a handful)

Directions:

Cook quinoa and let cool until room temperature.   Mix in the sun dried tomatoes, garlic, olive oil, lemon and herbs until combined well.   Fold in feta cheese and serve (hot or cold).

This would be great to take to lunch the next day.  Oooh, or with a grilled piece of chicken on top or some grilled eggplant, mushroom and peppers for a completely delicious summer meal.  I can't wait to get OUTSIDE and cook. :)

*as with any grain or bean, rinse WELL to clean off dust, debris, and potential pesticides/heavy metals!


Sunday, April 7, 2013

Flackers {Flax Crackers} Recipe

I have been making these for a couple months now.  Let's just say a batch does not last long!   Flax is a great source of Omega-3 fatty acid and protein, but better yet, these are vegan and have no additives, preservatives, msg, gluten, etc.  So simple, so crunchy...delicious!

You can vary the flavors with herbs and spices to your liking.  I've make a sweet version with almonds, cinnamon & banana, along with several savory varieties (powdered turmeric is awesome)!    Today I'm trying a "pizza" cracker.  It makes 2 baking pans worth, so feel free to cut this recipe in half for your first try and make one pan.

Ingredients:

2 c Flax seeds (golden or red)
2 c water (distilled & remineralized here)
2 T minced white onion
3 cloves garlic, minced
1 T Bragg's Amino Acid
1 tsp sea salt
1 T dry basil
1/2 tsp red pepper flakes
Parchment paper
Olive oil (to grease the paper)
2 baking pans
Patience

Directions:

  • Rinse the flax in a mesh colander to remove dust.   
  • Soak the flax seeds in the water.  The flax will produce a gelatinous coating and will absorb the water; it'll look like a gooey gloppy mess after 45 minutes. 
  • Pre-heat oven to 200 degrees.  
  • Mix in your add-ins (the rest of the ingredients) into the flax.  
  • Put a sheet of parchment paper on each baking sheet and lightly grease with olive oil.  
  • Spread the flax mixture very evenly on the two sheets, so that the flax are in layers that are 2-3 seeds thick.  I find using a back of a metal tablespoon works really well. 
  • Bake for 2.5 hours, opening the oven doors to let some moisture out every 30 minutes or so. 
  • After the first 2.5 hours - the sheet should be flexible but starting to firm up.
  • Once the flax cracker edges are crispy and you're able to pick up the whole sheet of parchment paper  and flax cracker sheet, flip it over.  You can discard the parchment paper at this point; it should be pretty moist. 
  • Bake approximately 2.5 more hours, continuing to open the oven occasionally.  We're getting all possible moisture out and these should be really crisped through the middle. 
  • You'll know they're almost ready when the flacker sheet starts to curl up at the edges. 
  • Break into cracker sized pieces.


These are awesome with dips like hummus, cheese, guacamole, etc.  They're also great by themselves.   Enjoy!
At a vegan potluck in March.  Served with sweet potato hummus and avocado-kale artichoke dip!
(No flackers survived this event.)


Thursday, April 4, 2013

Nutritional Test Day...Dun Dun Dunnnn (Part 1)

Blood draw time...at least it was in the comfort of my own home.
Today was the day.  Fasting since 9 last night, check.  Morning urine sample, check.  Mobile blood draw with 4 vials taken, check.  Miranda, our mobile phlebotomist from Michigan Mobile Phelbotomy was in and out within 20 minutes with our samples and off to the lab.  She'll send the urine & blood samples for the to Genova/Metametrix today and then we wait patiently for a couple weeks until the results are ready.  The test is called Individual Optimum Nutrition (full nutrient/mineral panel) + add-ons of lipid & thyroid, amino acid, undigested folic acid and vitamin K.  I have to admit it - I am little nervous to have my nutritional levels checked!   Why?

Well...because I make a serious effort, DAILY, to keep my wellness top of mind.  I make sure my diet is varied.  Colorful.  Balanced.  I eat plenty of green leafy veggies.  Drink protein/fiber smoothies with add-ins like bee pollen, spirulina and sea vegetables. I eat oysters and pumpkin seeds for zinc.  Frequent the farm market or the upscale grocers and buy organic produce, chicken and free range eggs.  We don't go out to eat much, and even then, I am conscious of what I order.  I don't drink pop or fruit juice.  I stay far away from HFCS, or any non-organic corn or soy. I limit the sugar in my coffee.  I drink about 2 cups of green or herbal tea every day. You won't find junk food in my home;  everything is cooked or baked from scratch. I barely eat grains, and when I do, it's mainly brown rice. If I bake, it's normally a healthified version, with healthy fats and gluten free flour.  I drink lots of distilled & re-mineralized water and juice fresh veggies.  I practice yoga and ride my bike for exercise. I grow my own veggies when possible.  I ferment my own kombucha tea and sauerkraut for healthy probiotics.  I go somewhere tropical about 2x a year for that added vitamin D. ;)  I've even cut WAY back on alcohol and no longer have that occasional 'social smoker' cigarette.   Take a peek into my "vitamin cupboard"; it looks like a dang health food store display!  You'll find all of the usual suspects (multi-vitamin, fish oil, probiotic, vitamin D, C...) as well as several strains of medicinal mushrooms, iodine, resveratrol, special fiber blends, and a wide array of other professional grade supplements.  I ask all kinds of health questions and have them answered by a Naturopath on the spot.  You get the point.....!  P.S.  This wasn't all implemented overnight, it's been a process for the past 3 ish years.

So what will it mean for me if my vitamin levels and fatty acid profiles are way off?!   To me, it will mean that maybe all of my efforts "aren't enough".  The whole "not being/doing enough" is a deeply rooted fear in my consciousness that affects other areas of my life.   Its something that I struggle with already.   Partially, I'm afraid it will set me back on my emotional journey. It will mean that I have to revise my already revised diet.  I will also be pretty nervous for the rest of my fellow Americans, because if I am deficient, lord help the rest of you!  (I'm half joking, but half dead-as-a-doorknob-serious).  

I do think the results will be empowering.  If there are areas that can be improved upon, I will KNOW exactly what I need to do to get on track, especially knowing I have the support and knowledge of Dr. Matt.   If the results are great, that will be an awesome reassurance that my hard work is paying off.

That's a LOT of nutrients, fatty acids, cholesterol and thyroid levels to test for!
Stay tuned.   I'll post my results and share my POA (Plan of Action) when the results are in.....


Monday, April 1, 2013

{Clean} Water. Agua. Eau. H20.


As the body is made up of mostly water, and uses it for essentially every function of the body, it's pretty common sense to ensure we are getting enough, and through a good source.  How much is enough?  A good rule of thumb is drinking 1/2 your body weight in oz every day.  For example, a 120 lb person would drink 60 oz daily, and a 200 lb person would drink 100 oz.  More on days that we're active; outside sweating or working out, practicing yoga.  

Since we need so much water, it's really important to drink water that's CLEAN.   So what's the best go-to source?  Tap, bottled, filtered, alkaline, distilled?

Tap Water.    The municipalities will argue that their water is plenty clean.  Better yet, it's chlorinated and fluoridated which is helpful to strengthen teeth!!! (NOT).  I won't get into the fluoride argument here, but urge you to Google "fluoride in water" or check out the Fluoride Action Network.   Listen, if I'm super thirsty, and at someone else's home, I won't refuse a drink of tap water.   On a regular basis, it's definitely not something I am comfortable consuming in large amounts. 

Bottled Water.   You might be interested, or surprised to know that most bottled water (Dasani and Aquafina amongst others) is simply...TAP water from your local municipal source (DETROIT RIVER, baby!)  BPA plastic bottles filled with the same water that I could get out of the sink at $1-2 a bottle while wrecking the environment?  No thanks. 

Filtered.   Filtered water is a step up from bottled, as they use a carbon and resin filtration process to remove large particles from the water.  Filters like Brita or Pur claim to make water taste better. Recently, they've removed the claims that the filters remove lead from their packaging.  These filters do not remove fluoride or pharmaceutical compounds.  Also, after 6 months of use, the carbon filters can actually become a breeding ground for bacteria (yum).  They also take up space in the fridge and can acquire smells from your leftovers (double yum). 

Alkaline Water. In a nutshell, simply drinking alkaline water and eating alkaline foods to balance the body is NOT simple as people on the internet are making it out to be. Have you heard lately:  "Drink kale juice, it's alkalinizing!"  "Lemon will counteract the alkalinizing effect of kale, be careful!" or "Meat makes you acidic."  I've read quite a bit about pH and also talked to Dr. Matt and my conclusion is that the body's systems are way complex. Attempting to change pH levels in the body by eating certain foods or drinking special waters is oversimplifying to say the least.  Read about shattering the myths of acid & alkaline here.  I wouldn't waste money lugging huge bottles of alkaline water home from the health food store. 

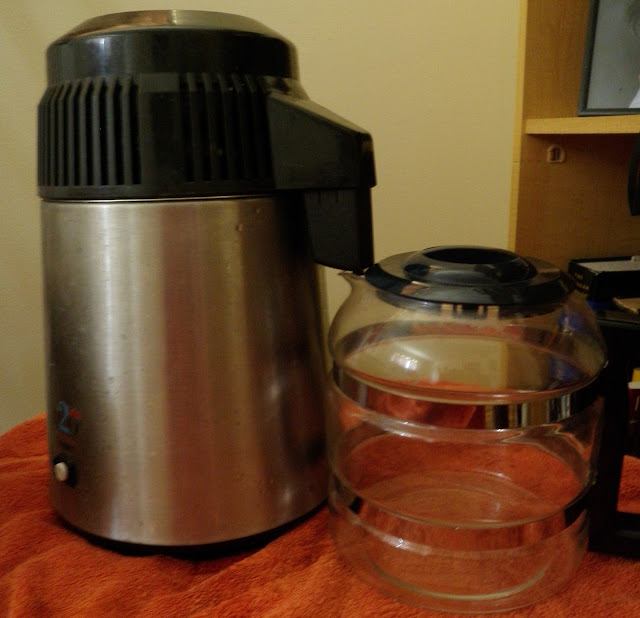
Distilled.   After doing my homework, we landed on distilled as the best option available to remove fluoride, chlorine, heavy metals, and your neighbor's cholesterol meds and anti-depressants. Many consider distilled water "dead" or "flat" because literally EVERYTHING gets boiled out of it (even the minerals).  Really, we should be getting most of these nutrients from fresh food, rather than relying on water. To cover our bases, it is important to use a trace mineral supplement to replace what the distillation process removes.  So, 2+ years ago, we settled on H2O Labs for a distiller and are now drinking distilled water at home.   It does take several hours to produce a gallon of distilled water, but we've gotten used to it and now I use it for drinking, making soup broth and steaming food.  The water tastes delicious and I can rest assured that it's super clean.  


Finished gallon of distilled water with Concentrace Minerals. Note the lovely litro carafes (behind the gallon) that we store extra water in!
This is what's left after a week of distilling our tap water.  It even smells chemically.  Pretty gross. 
Our distiller, from H2O Labs.